

MTD for Income Tax Self Assessment (ITSA)
This section guides you through setting up and filing the required quarterly updates for your sole trade or property income. Quarterly updates cover trade and property income and expenses only — capital gains are never part of them. A gain is instead reported separately, either via HMRC's 60-day Capital Gains Tax on UK property service or, for other disposals, as part of your annual Final Declaration (see Final Declarations).
Before you start: Your income sources (Self Employment, UK Property, Foreign Property) will not appear in My Tax Digital until you have completed HMRC ITSA authorisation — see the HMRC ITSA Auth guide. If authorisation is complete but a specific source is still missing, it may not be registered with HMRC. Check your registered sources in your HMRC online services account under Income Tax > View and manage Making Tax Digital for Income Tax. Each income source type is registered with HMRC independently — having one source (e.g. Self Employment) appear does not mean another (e.g. UK Property) is also registered; check and add each one separately if it's missing. Being signed up for MTD for Income Tax is not the same as having an income source registered: your HMRC online account can show you're signed up even when no self-employment or property business is listed, so check the businesses themselves.
Nothing is sent to HMRC until you click Submit — you can review and enter figures on any quarterly update screen to explore how it works, or to compare against your accountant's figures, without committing anything.
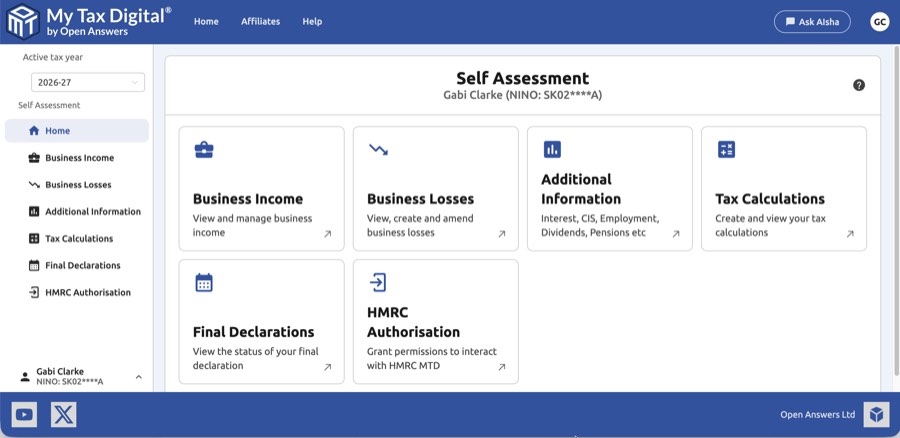
In My Tax Digital, "Self Assessment" is the MTD Income Tax (ITSA) section — there is no separate "ITSA module" to find or enable. If you have signed up for MTD ITSA with HMRC, this is where you access your quarterly updates: click Self Assessment in the left-hand menu, select your tax year, then Business Income to reach your income sources.
Standard or Calendar quarterly periods?
Each income source can report using either Standard or Calendar quarterly periods. This can only be changed before any submissions have been made for the tax year.
| Standard | Calendar | |
|---|---|---|
| Quarters | 6 Apr–5 Jul, 6 Jul–5 Oct, 6 Oct–5 Jan, 6 Jan–5 Apr | 1 Apr–30 Jun, 1 Jul–30 Sep, 1 Oct–31 Dec, 1 Jan–31 Mar |
| Best for | Most users | Users who want their MTD quarters to align with calendar-month VAT quarters |
If you choose Calendar periods, your MTD tax year for that income source runs from 1 April to 31 March rather than 6 April to 5 April — so income and expenses from 1–5 April are reported in the new tax year's first quarter, not the previous year's final quarter. There is no separate reconciliation needed for this short window; it is simply included in whichever quarter it falls into under your chosen period type.
Because each quarterly update is cumulative, the Obligations tile lists every period from the start of the tax year to that quarter's end, not just the three months of the quarter, so every period shares the same start date (for example 1 April under Calendar periods). This is expected, not a display fault.
If you try to change the period type after a quarterly update has already been submitted for that income source and tax year, HMRC will refuse the change. HMRC fixes the period type for the whole tax year once the first update has been sent, and you can only choose again for the following tax year. The income source settings show a reminder of this above the Period type option. In this situation the app may show "HMRC has not yet finished processing a recent change to this business". Don't keep retrying. If you've already submitted for the year, the change won't go through. Carry on with the period type HMRC holds and use the dates shown on the Obligations tile.
If you haven't submitted yet and see that same message, a change you made recently is probably still being processed. There can be a short delay before HMRC's acceptance shows in My Tax Digital. If the screen still shows the old period type, wait a few days and check again rather than repeating the selection. If you pick the period type that is already in place, the app tells you "No change needed - this income source is already set to that period type." HMRC are not applying penalty points for late quarterly updates in the first year of MTD for Income Tax (2026-27), so a short delay here carries no penalty risk. If you are still unsure which period type is registered, check your HMRC online services account.
If you see a "Start date does not align to the reporting type" error when submitting a quarterly update, the dates you've entered don't match what HMRC expects for your registered period type (Standard or Calendar) — this can happen if the screen is showing a period type that doesn't match HMRC's own record. Before re-entering dates, check the Obligations tile for that income source — it shows the exact period HMRC is expecting for the next submission. Use those dates rather than calculating them yourself, and the error should not recur.
The most common cause is changing the Start date to the beginning of the quarter (for example 6 July) instead of leaving it at 6 April (1 April under Calendar periods). Every update is cumulative and must start from the beginning of the tax year, so don't edit the start date for a later quarter. Only the end date changes.
If a quarterly update is rejected with "Start/end date not accepted for annual/latent submission", the rejection comes from HMRC. Your figures and dates aren't the problem. It means HMRC's own record for that income source says it isn't reporting quarterly for the selected tax year. For example, it may be flagged as reporting annually for that year, or HMRC may have it starting quarterly reporting in a later tax year. The setting is held per income source, so your other income sources can still submit normally. My Tax Digital can't change it. Call HMRC's MTD for Income Tax helpline on 0300 200 3310 and ask them to confirm the reporting basis they hold for that income source and tax year, and to correct it if it's wrong. You don't need to change anything in the app. Once HMRC update their record, submit again as normal.
If the Obligations tile shows nothing at all for an income source, rather than an Open or Fulfilled period, this is different from the error above — it means HMRC has not yet created any obligations for that income source, usually shortly after sign-up. This resolves itself once HMRC finishes setting up the registration; retrying the submission or changing settings such as Periods of Account will not speed it up and can make things harder to diagnose if it doesn't clear. If it's still empty after a week or so, contact support.
If an income source's Obligations screen asks "Have you signed up for the selected tax year?" and mentions a wait of up to 72 hours, check the Active Tax Year dropdown at the top left of the Self Assessment screen first. The same applies if a submission comes back with an HMRC "Not found" response. This message also appears when the dropdown is simply set to a year you aren't signed up for, such as 2025-26 when you joined MTD in 2026-27. Switch to the correct year and the obligations and submission screens will appear straight away. The 72-hour wait only applies if you have signed up with HMRC very recently.
Bridging mode or Accounting mode?
My Tax Digital supports two ways of submitting your quarterly figures:
| Bridging mode | Accounting mode | |
|---|---|---|
| How it works | Keep your own spreadsheet; import a summary each quarter | Record individual transactions directly in the app throughout the year |
| Transactions | Not available — no linked Business | Available under Digital Records on the income source screen (and in the left-hand menu if the linked Business is VAT-registered) |
| Best for | Users who already keep records in a spreadsheet or accounting software | Users who want to manage all records within My Tax Digital |
If you choose Bridging mode, you do not need to change how you keep your day-to-day records — carry on using your own spreadsheet, accounting software, or paper records as normal. The template is only used to summarise and import your cumulative totals each quarter; it is not a replacement for your own bookkeeping.
Switching mode: You can switch between Bridging and Accounting mode at any time by returning to the income source settings — go to Business Income, click the income source, then click the Edit button below the income source details. Choosing Bridging also requires you to select an Industry before you click Submit. This applies to all income source types — self-employment, UK property, and foreign property. Because HMRC always receives cumulative year-to-date figures (not period-by-period deltas), switching mid-year is straightforward in either direction: your previous submissions are unaffected, and the next submission simply reflects the cumulative totals from the start of the tax year. If switching to Accounting mode mid-year, make sure your linked business has transactions recorded from the start of the tax year so that cumulative figures are complete. Switching the other way, from Accounting to Bridging, needs the same care in reverse: your next spreadsheet import must total the full cumulative year-to-date figure, including whatever was already recorded as transactions under Accounting mode, not just the activity since you switched.
Switching to Bridging does not delete anything. The Business you used in Accounting mode and the transactions you have entered on it are kept, but the income source no longer uses them, so there is no Transactions section while it is in Bridging mode. You can use the totals from those transactions to build your first Bridging import, then carry on with your own spreadsheet. If you switch back to Accounting mode later, select the Business again in the Linked business dropdown.
Relinking to a different Business: An income source in Accounting mode can be relinked to a different existing Business at any time — for example, if switching to Accounting mode auto-created a new Business, leaving your existing transaction history stranded on an older one. Open the income source's Accounting mode settings (Business Income > click the income source > Edit) and use the Linked business dropdown to select the correct existing Business instead of the current one. There's no need to re-enter or re-import anything — once saved, the quarterly update screens pull in the newly-linked Business's transactions immediately.
If you cannot see Transactions in the left-hand menu or on your home screen, you are most likely in Bridging mode — this is expected. In Bridging mode there is no linked Business, so there is no Transactions section. Your records stay in your own spreadsheet and you import quarterly totals using the Bridging mode guide below. If you are in Accounting mode and still cannot see Transactions, check that HMRC ITSA authorisation has been completed — income sources and their linked Businesses will not appear until auth is done. If authorisation is complete and Transactions is still missing, remember that it belongs to the linked Business, not your Individual profile. The entity switcher at the bottom-left of the screen only lists a linked Business there if it is VAT-registered — for a non-VAT-registered Business, use the Digital Records tiles on the income source home screen instead.
If you can see Transactions and have been recording them, but your quarterly figures still show as zero: check which mode the income source itself is set to. It's possible for an account to have a linked Business with an active Transactions section while the income source is still set to Bridging — transactions recorded in that Business only feed the quarterly submission once the income source itself is switched to Accounting mode (see Switching mode above).
To record individual transactions in the app instead, you need Accounting mode, which creates a linked Business with a Transactions section. See the Accounting mode quick start guide below.
Each income source — whether self-employment, UK property, or foreign property — runs its own independent quarterly schedule. This also applies if you have more than one income source of the same type, such as two self-employment businesses: each is submitted separately using its own template or transactions, and there is no combined or joint submission across income sources. Multiple income sources can use different period types (Standard or Calendar) and have different obligation due dates. You must fulfil obligations for each source separately.
Quick start guide to submitting quarterly updates using Bridging mode:
Each quarterly upload should contain cumulative year-to-date figures — from the start of the tax year (or your digital start date, if later) to the end date you set — not just the figures for that quarter in isolation. HMRC always works from your latest cumulative submission, so set up your spreadsheet to total from 6 April (or 1 April under Calendar periods) rather than resetting each quarter.
- From the Self Assessment screen, click Business Income, then click your income source (e.g. Self Employment, UK Property, or Foreign Property). If this is your first time accessing this income source, you will be prompted to choose a submission mode — select Bridging. This unlocks the income source hub where the Obligations tile will appear.
- Click on Obligations then an Open obligation, this takes you to the update screen.
- Set the end date to the date your figures are made up to. If you arrived here by clicking an ended, unfulfilled obligation on the Obligations tile, the end date is preset to that quarter's end date; otherwise it defaults to today. The end date can be set up to 10 days ahead of today but cannot be set to the full quarter end until close to that date — if the quarter end date appears greyed out, simply set the end date to the latest date your figures currently cover and resubmit closer to the deadline.
Note: You can submit an update as often as you like, and the end date does not have to align with your quarter end — a submission dated later than the quarter end is not a problem, since it is simply superseded by your next update. However, once you have submitted with a given end date, you cannot submit again with an earlier one — HMRC only accepts the same or a later end date each time. If you submit sooner than planned with today's date rather than the quarter end, there is nothing to undo, but that quarter's obligation stays Open until you submit again with figures up to the quarter end date. The Obligations screen flags this with "You've submitted part of this period - submit again with figures up to [date] to mark it fulfilled."
- On the "Update Income and Expenses" screen, click the "Import figures" button. Once your spreadsheet is uploaded, review the imported figures before submitting.
Note: The Import figures button accepts both XLSX and CSV files — if using CSV, your figures must appear at the same cell positions as the XLSX template. The same cell-position requirement applies to XLSX files too, including a custom workbook you've built yourself rather than the downloaded template — if your figures aren't in the same rows/columns as the official template, the import finds no figures and shows a "No figures found" warning under the sheet selector. Check you've selected the right sheet, then check the layout. Compare your layout against the template below if in doubt. If you're on a Mac and use Numbers, export your workbook via File > Export To > Excel... to produce a compatible XLSX file — there's no need to isolate a single sheet, the importer reads from the first sheet in the file by default. This import is only available in Bridging mode; in Accounting mode, quarterly figures are built from Transactions instead and there is no summary spreadsheet import — see Switching mode above to change.
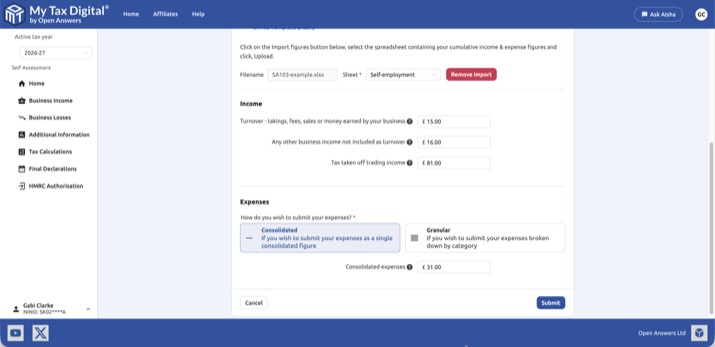 5. Open the downloaded Income and Expenses template and add it as a new sheet to your existing accounting spreadsheet.
Download example SA103 Self Employment template (XLSX)
Download example SA105 UK Property template (XLSX)
Download example SA106 Foreign Property template (XLSX)
-
Link the income and expense cells in the template sheet to your figures by adding cell references to your existing sheet.
Note: Cell references must point to other sheets within the same spreadsheet file. References to cells in a separate file on your computer (e.g.
=[OtherFile.xlsx]Sheet1!B5) will not resolve when the file is uploaded and will produce blank figures.Enter every figure, income and expenses alike, as a positive amount with no minus sign or brackets. The importer keeps whatever sign is in the cell: a negative income figure will be rejected, but a negative expense figure is accepted and reduces your total expenses, which overstates your profit. If your own spreadsheet shows expenses as negatives, reverse the sign in the cell reference (e.g.
=-Sheet1!B5). -
Save the completed spreadsheet to your computer.
-
Click "select file" in the file chooser, select the saved spreadsheet, and click the "upload" button. The figures will load from the first sheet, but you can choose an alternative sheet if necessary.
-
Review the imported figures against your original spreadsheet and click "submit".
After submission, you can check that the update was successful by clicking on the "Income and Expenses" tile — the Submission period field shows the date range covered by your latest submission, and the figures displayed are refreshed from HMRC. You must make at least four updates, one after each quarter, to fulfill your obligations.
Quick start guide to submitting quarterly updates using Accounting mode:
- On the self-assessment homepage, select the relevant tax year. Choose the "business income" tile, and then select an income source, such as "UK property". The process is the same for self-employment and foreign property.
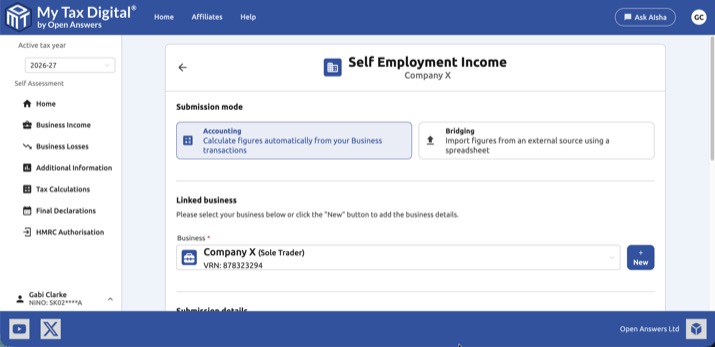
- Click on "Accounting" to use accounting mode, which records income and expenses and automatically calculates the quarterly income tax summary. The screen below shows the toggle between Accounting and Bridging mode, along with the linked business.
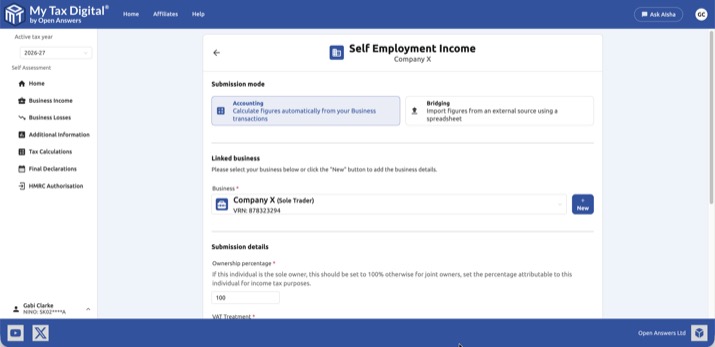
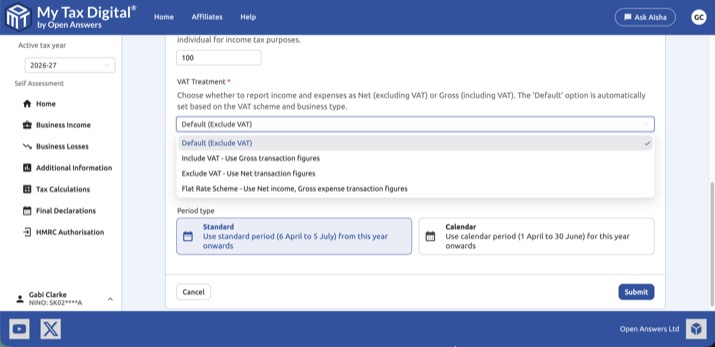
- Set the percentage of income attributable to you (e.g., 50% for jointly owned property). Select a VAT Treatment to control how transaction figures are recorded.
| Option | What it does |
|---|---|
| Default | Automatically set based on your VAT scheme and business type — see table below |
| Include VAT | Records all income and expenses as gross (VAT-inclusive) figures |
| Exclude VAT | Records all income and expenses as net (VAT-exclusive) figures |
| Flat Rate Scheme | Records income as net figures and expenses as gross figures |
The Default option resolves as follows:
| Income type | VAT registered? | VAT scheme | Default behaviour |
|---|---|---|---|
| UK Property | Any | Any | Gross (include VAT) |
| Foreign Property | Any | Any | Gross (include VAT) |
| Self Employment | No | — | Gross (include VAT) |
| Self Employment | Yes | Standard | Net (exclude VAT) |
| Self Employment | Yes | Flat Rate | Flat Rate Scheme |
| Self Employment | Yes | Cash Accounting | Gross (include VAT) |
If your linked business uses the VAT Flat Rate Scheme, the Flat Rate Scheme option will be selected automatically. You can change this at any time by returning to Self Assessment > Business Income > click your income source, adjusting the VAT Treatment dropdown, and clicking Submit.
If your Flat Rate percentage changes partway through a tax year (for example, your first-year 1% discount expires), submit your current quarter under the old rate before changing the setting — the new percentage applies to all subsequent submissions, including the cumulative year-to-date figures, from the point you change it. If you need precise control over which rate applies to which portion of a quarter, use Bridging mode with the SA103 template instead, where you calculate the blended figures yourself.
Note: Which VAT treatment is correct for your circumstances is a tax question — if you are unsure, consult a qualified accountant or tax advisor.
- Because accounting mode was chosen, you will be prompted to add a linked business to record income and expenses.
- Complete the required fields, noting that some are pre-filled with HMRC information.
- For VAT-registered businesses, enter the VRN and VAT scheme.
- Complete the remaining business details and submit.
- Confirm your accounting period and click submit.
- The submission mode will now be set to "Accounting" with the linked business set. To add income and expenses, use the Digital Records tiles on the income source screen. If the linked business is VAT-registered, you can also click the Linked Business button there, or select the business in the switcher at the bottom left. A business that isn't VAT-registered isn't listed in the switcher, and its Linked Business card can't be clicked, so use the tiles.
- Record Transactions (Manually):
- From the income source screen (Business Income > your income source), click Transactions under Digital Records. If the linked business is VAT-registered you can also reach Transactions from its business home screen.
- Click the "Add" button.
- Select the date, input a transaction description, and optionally assign a contact or business.
- Choose a category (which are UK property specific in the example) and transaction type.
- Enter a VAT rate (if applicable) and the gross amount; the net amount will be calculated. If the linked business isn't VAT-registered, there's a single Amount field instead.
- Indicate if it is a refund, and then click submit. This saves the transaction in My Tax Digital only. Nothing is sent to HMRC until you submit the quarterly update (step 9).
- Import Transactions (Bulk):
- From the transaction screen, click "Manage," then "Import".
- On the import screen, select "File import," and then "Select a file" to open the file chooser.
- Select a spreadsheet or CSV (e.g., bank transactions or financial records from other software) and click "Upload".
Download example transaction template (XLSX)
Download example transaction template (CSV)
The system will attempt to map the file's data, but date, description, and amount are required at a minimum. Check the preview and click "Submit". You can delete the import and start again if needed. 9. Submit Update to HMRC: * Click on "Home," then choose "Self-Assessment," and click "Go to MTD Self Assessment". * On the self-assessment screen for your business, click on "Income and expenses". * Click on "Prepare update". * Because you are in accounting mode, the boxes will be pre-filled with cumulative totals from your transactions for the selected update period. * Check your figures and click "Submit".
Note: If refunds recorded against an income category exceed the income for that category in the period, the calculated figure will be negative — HMRC does not accept negative income figures, so the app blocks submission on that field until you correct the underlying transactions (e.g. by categorising the refund differently or adjusting the amounts).
You can make as many updates as you like, but you must make a minimum of four updates, one after each quarter has ended, to fulfill your obligations.
Confirming a quarterly update reached HMRC
After submitting a quarterly update, you are returned to the income source screen rather than the update screen itself. To confirm the update was received, click through to the Income and Expenses tile — the end date of the Submission period field, and the figures shown there, are refreshed from HMRC and confirm a successful submission. This applies in both Bridging and Accounting mode. The Income and Expenses tile shows only figures already sent to HMRC, so transactions you have recorded but not yet included in a quarterly update don't appear there. The on-screen confirmation banner shown right after submitting only persists for that browser session — it won't reappear on a later visit or after a page reload.
The Obligations tile will continue to show a period as Open until HMRC receives a submission covering the entire period through to its end date — submitting early (for example, ahead of the quarter-end deadline) will not mark the obligation as fulfilled; you'll need to submit again once you have figures for the whole period.
After each update, later periods show an amber You've submitted part of this period message. This is normal, not an error. It clears when you submit with figures up to that period's end date. For example, an update ending on 29 July marks Q1 as fulfilled, and the later periods show as part-submitted until you submit up to their end dates.
Some customers have found their HMRC online account takes a little while to reflect a submission made through My Tax Digital — this delay is on HMRC's side and does not mean the submission failed.
If HMRC tells you a quarterly update hasn't been received but your Income and Expenses tile shows it went through, check whether you have more than one income source. For example, you might have a self-employment and a UK property source, or two self-employments. Each one appears as its own tile under Business Income with its own Obligations, and HMRC's reminder may be about a source you haven't submitted for yet.
Keeping a record of what you submitted: My Tax Digital keeps a receipt of every quarterly update you submit. On the Income and Expenses screen, the Recent submissions section lists your latest three for the selected tax year. Click View all for the full list, then click a submission and use Print/Download to save a PDF showing the period, submission date and figures sent to HMRC. Submissions made before receipts were introduced (September 2026) show the submission details only, marked "Figures not recorded".
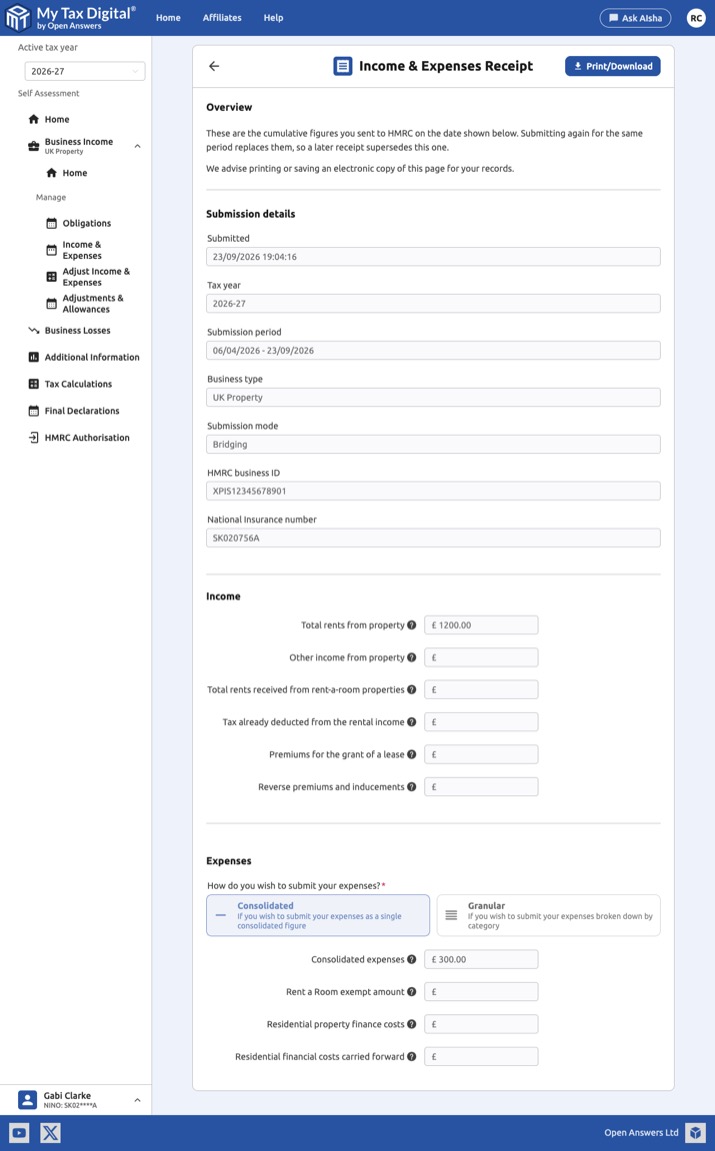
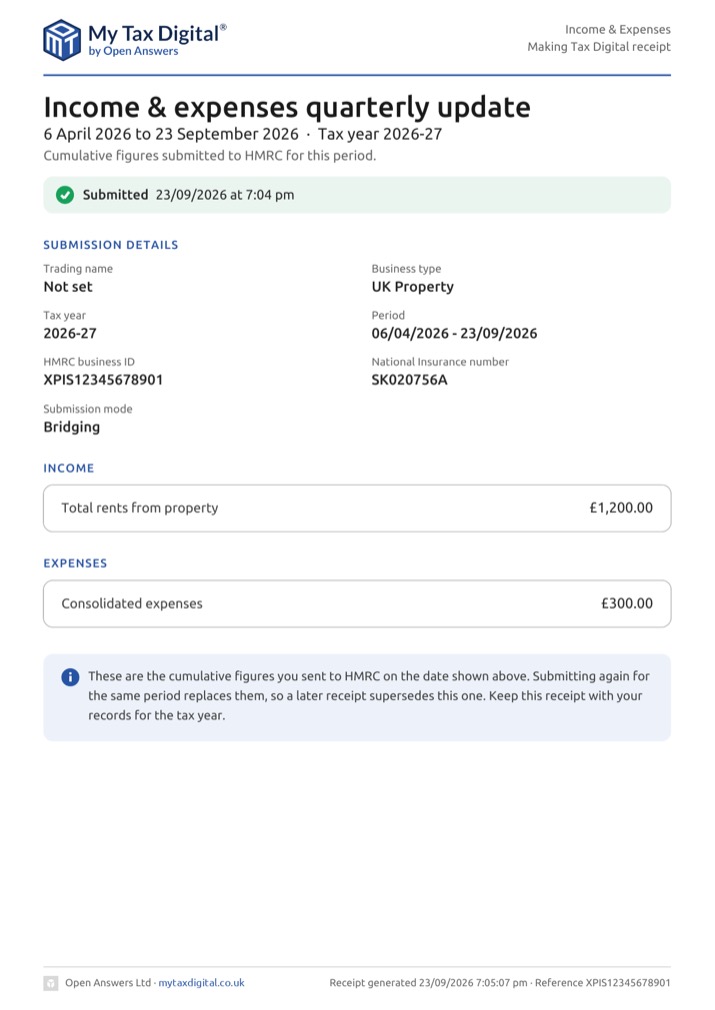
Neither My Tax Digital nor HMRC sends a confirmation email or reference number for a quarterly update; HMRC only issues those for the Final Declaration (see Final Declarations).
Calendar period type and the Overview tile: if you've switched to Calendar quarterly periods, the Overview section's "Reporting period" tile can take a little longer to reflect the change than the Prepare Update screen, which shows the correct dates immediately. This is cosmetic only — check the dates on the Prepare Update or Obligations screen rather than the Overview tile if they seem to disagree.
During HMRC scheduled maintenance: you'll see "The HMRC service is temporarily unavailable due to scheduled maintenance, please try again later". Anything that needs a live answer from HMRC, such as obligations, submissions and Additional Information, is unavailable until the maintenance ends. Your transactions and other records are stored in My Tax Digital and aren't affected. The Business Income screen and your income source details show the last details we received from HMRC, with a "HMRC is currently unavailable" warning giving the date and time they were retrieved. They may be out of date, and you can still use the Digital Records tiles from there. If HMRC has never returned your income sources to My Tax Digital, there is nothing stored to show, so the list stays empty until HMRC is back.
"The HMRC service is temporarily unavailable, please try again later" (without mention of maintenance) means HMRC is not responding. As with maintenance, Business Income shows the last details we received from HMRC under a "HMRC is currently unavailable" warning, if any are stored. Wait and try again later, and check for an in-app banner about HMRC availability. Don't re-authorise with HMRC or add a new Individual. Neither will help, and your data is not lost.
Adding an Individual for Income Tax Self Assessment
If you've not already created an Individual for the purposes of submitting Income Tax Self Assessment (ITSA) then you'll need to follow these steps:
-
From the side menu, click the link to Add Business/Individual.
-
Choose "Individual" as the type of entity you want to add.
-
Input your First name, Last name, and your UK National Insurance number (NINO).
- Note: The NINO is essential for linking your profile to HMRC's ITSA records.
-
Click "Submit" to save the individual income source.
Other ITSA Screens (Annual Finalisation)
The following sections allow you to perform year-end adjustments, declare other non-business income, and manage any business losses.
Year-end finalisation — the five steps in order
Once your four quarterly updates are complete, the following screens become relevant. They are all available from the Self Assessment home screen for the tax year throughout the year — nothing needs to be unlocked or converted between quarterly and year-end working, you simply move on to the next tile once your quarters are done:
- Adjust Income & Expenses — optional; adjust your annual totals after Q4; in-year mistakes are fixed by resubmitting a quarterly update instead.
- Adjustments & Allowances — apply capital allowances and other year-end tax adjustments not included in the quarterly updates.
- Additional Information — declare non-mandated income such as savings interest, dividends, pensions, and employment income.
- Tax Calculations — trigger an estimate of your full-year tax liability before finalising.
- Final Declaration — review HMRC's definitive calculation and submit, replacing the old annual Self Assessment return.
Each step is covered in detail below.
Note: Your fourth quarterly update is not the same thing as the Final Declaration. Submitting Q4 only fulfils that quarter's Obligations period — you still need to complete the five year-end steps above, ending with Final Declaration, to finalise your tax return for the year.
Adjust Income & Expenses
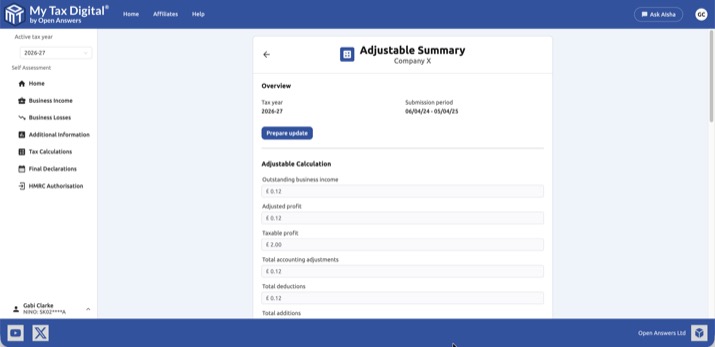
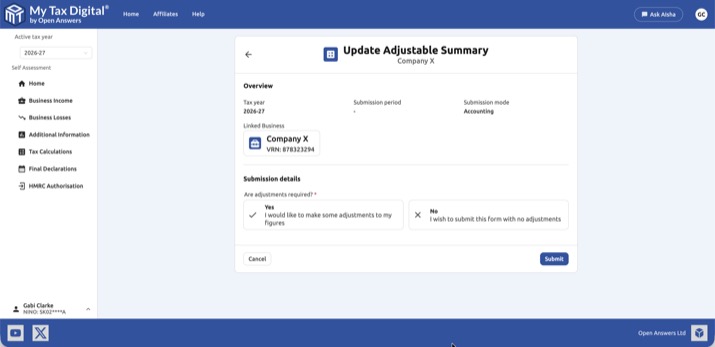
This screen is a year-end step, used after your fourth quarterly update to adjust the annual total for an expense or income category. It is not the way to fix a mistake during the year. To correct an in-year figure, including one in a quarter you've already submitted, open Income & Expenses and click Prepare update again, then submit your corrected cumulative figures. Each submission replaces the previous one (see Resubmitting). HMRC recommend resending your fourth quarterly update, rather than using this screen, if the error is in your Q4 figures.
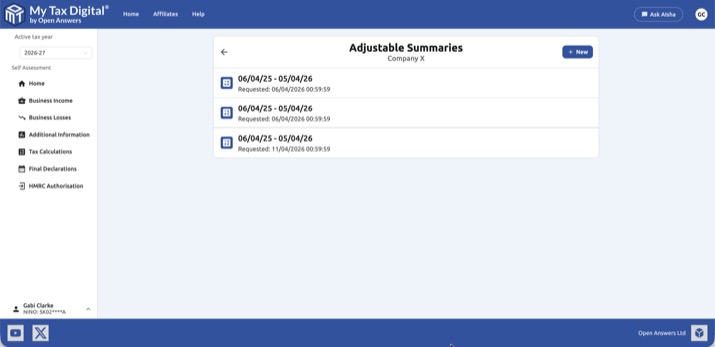
Click a period to view its summary detail, then click Prepare update to begin adjusting.
-
Access Adjustment: Select the Adjust Income & Expenses tile from the ITSA dashboard.
-
Select Period: Choose the specific Tax Year you need to adjust.
-
Review Totals: The screen will display the cumulative annual total for each income and expense category based on the four quarterly updates you previously filed.
- Note: Since the quarterly updates are cumulative, correcting an error in a previous quarter will affect the figures here.
-
Enter Corrected Figures: If you find an error (e.g., you missed an invoice or wrongly categorised an expense), you can override the automatically calculated total for the relevant category and enter the correct, final annual figure.
-
Submit Adjustment: Click "Submit Adjustment". This sends the updated annual totals for that income source to HMRC, ensuring your total profit calculation is accurate before proceeding to the final declaration.
Adjustments & Allowances
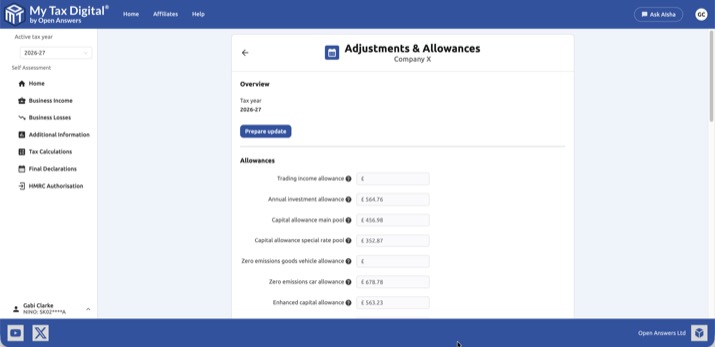
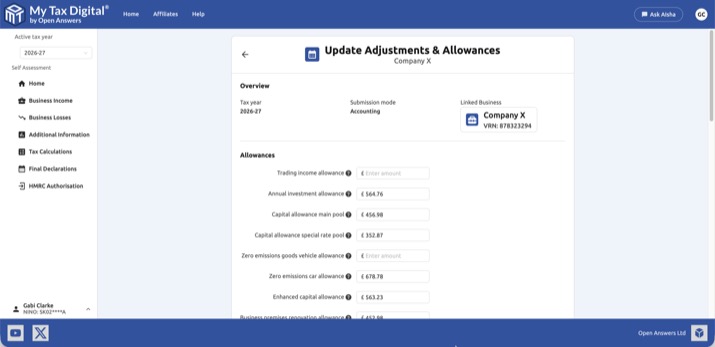
This is a critical year-end screen used to apply tax and accounting rules that are not included in the quarterly updates.
-
Access Screen: Select the Adjustments & Allowances tile from the ITSA dashboard.
-
Make Accounting Adjustments: If you are using the traditional (accrual) basis of accounting, you will enter amounts here for items like:
- Prepayments: Paying an expense that relates to a future tax year (e.g., insurance paid in advance).
- Accruals: An expense that was incurred but not yet paid or invoiced by the tax year end.
-
Claim Tax Allowances: Enter your claims for tax reliefs that reduce your profit, such as:
- Capital Allowances: Claims for qualifying business assets (e.g., equipment, vehicles).
- Disallowable Expenses: Deduct any expenses that are not allowable for tax (e.g., personal use portion of a phone bill, entertainment).
- Rent a Room Relief: If applicable, claim the tax-free allowance for letting furnished accommodation in your own home.
-
Finalise: Click "Save and Proceed". The system uses these figures to finalise the statutory taxable profit or loss for the income source.
Brought Forward Losses
This screen tracks and applies any tax losses carried over from previous tax years to reduce your current year's tax bill.
-
View Brought Forward Loss: Select the Brought Forward Losses tile. The screen will display any unused losses from earlier tax years that are available to be used now.
-
Apply Loss: The system will automatically, or prompt you to, apply any eligible brought forward losses against the current year's taxable profit for the same trade.
-
Update Balance: Once applied, the remaining available loss to be carried forward to future years is updated.
Loss Claims
This screen allows you to make claims for losses incurred during the current tax year against other income (known as 'sideways relief').
-
Identify Current Loss: Ensure your Adjustments & Allowances screen has confirmed a trading or property loss for the current tax year.
-
Claim Relief: Select the Loss Claims tile. You can then specify how you wish to use the loss:
- Sideways Relief: Claim to set the loss against your other sources of income (e.g., employment, dividends) from the current year, subject to HMRC caps.
- Carry Forward: Choose to carry the loss forward to be used against profits of the same trade in future tax years.
-
Submit Claim: Click "Submit Loss Claim" to inform HMRC of your intention to use the loss in the specified manner.
Tax Calculations
The Tax Calculations section allows you to view an estimate of your Income Tax and National Insurance liability at various points throughout the year. This gives you a better idea of how much tax you may owe before the annual filing deadline.
This calculation is an estimate based on the information submitted to HMRC so far. It should not be treated as your final tax bill.
-
Navigate to Tax Calculations: Click Tax Calculations in the Self Assessment section of the left-hand menu, or use the Tax Calculations tile on the Self Assessment Home screen. See the Tax Calculations guide for full details.
-
Trigger a New Calculation: To get the latest estimate based on your most recent quarterly update and any adjustments:
- Click the New button in the top-right corner of the Tax Calculations screen, choose the Calculation type, and submit.
-
View Calculation History: The main Tax Calculations screen displays a history of all previously requested estimates, showing the period, the creation date, and the type of calculation requested (e.g., In year, Intent to Finalise, Final Declaration).
-
Review the Calculation Details: Click on any calculation in the list to view the full detailed breakdown.
- Overview: Shows the tax year, the period covered, and the request details.
- Messages: This section will flag any important Info, Warnings, or Errors returned by HMRC that could affect the accuracy of the calculation.
- Example Warning: You may need to provide further information during the final declaration.
- Example Error: You have not provided final confirmation of income and expenses for all business sources.
- Inputs: Lists all the financial information used to create the estimate (e.g., personal information, income sources, allowances, losses, claims).
- Calculation: Provides the estimated results, including the breakdown of:
- Taxable event gain income
- Pension profit
- Student loans
- Total Income Tax and National Insurance due
Calculation entries cannot be deleted — they are HMRC's own record of each estimate you have requested, not draft data of yours to tidy up. Having several entries in the history is normal (for example, after triggering more than one estimate in a period) and has no effect on your final tax position or submissions.
You may notice that income figures in a calculation are based on annual or year-to-date HMRC records (such as PAYE income) while expense figures reflect only the quarterly updates submitted so far for that income source. This mix is expected — it is not an error, and the calculation becomes more complete as you submit further quarterly updates.
Final Declarations
The Final Declarations screen is the final step in the MTD for ITSA process and takes place once a tax year has ended (after 5 April). This declaration replaces the old annual Self Assessment tax return.
Purpose of the Final Declaration
The Final Declaration is your annual chance to tell HMRC about all your income and apply all personal allowances, reliefs, and finalise your tax calculation.
It includes:
- The business and property figures that were finalised in the Adjustments & Allowances screen.
- Any non-mandated income (e.g., employment, dividends, savings interest).
- Any personal claims or reliefs.
-
View Open Declarations: From the ITSA menu, click on Final Declarations. This screen displays a list of tax years for which a declaration is due. An "Open" status means the final submission for that year has not yet been filed with HMRC.
-
Select Declaration: Click on the required period (e.g., 06/04/18 - 05/04/19) to begin the finalisation process.
-
Review and Add Information: Before submitting, the app will guide you through sections to ensure all your income is accounted for:
- Business Income: Confirms the final profit/loss figures that were determined using the Adjustments & Allowances screen for all your self-employment and property sources.
- Additional Information: This is where you declare any non-mandated income that was not included in the quarterly updates, such as:
- Employment income
- Savings and interest income
- Dividends
- Capital Gains
- Pension income
- Tax Calculations: Use this screen to run a final, definitive tax estimate before submission.
-
Confirm and Submit: Once all income, allowances, and reliefs have been entered and the tax calculation has been reviewed, you will make the final legal declaration.
- Click the "Submit Final Declaration" button (usually found on the review page).
- The status of the tax year will change from "Open" to "Fulfilled," confirming the completion of your MTD ITSA requirements for that period.
Note: Once the Final Declaration is submitted, you can still amend it - see Amending after a Final Declaration. For information on paying your tax bill after submission, see the Final Declarations guide.