
Digital Record-Keeping
Digital record-keeping is a legal requirement for MTD. My Tax Digital provides a simple cashbook (Transactions section) to record your business finances.
Quick start guide to digital record-keeping
Recording Transactions Manually
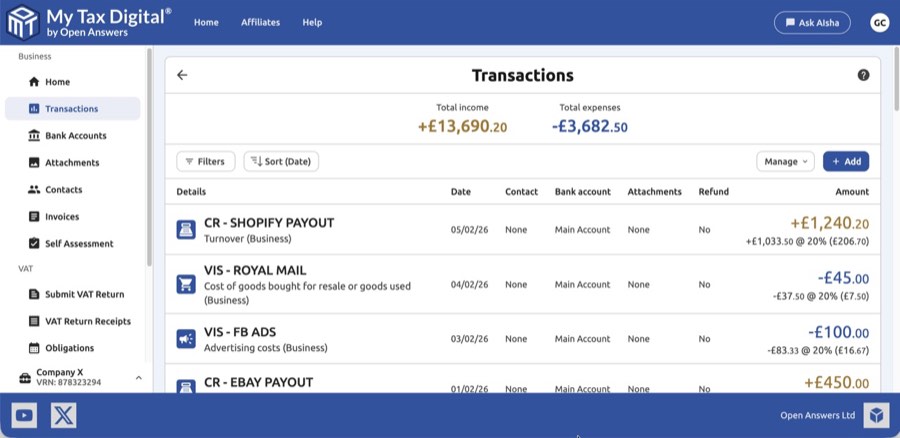
- Click on the "Transactions" tile to start recording your income and expenses.
- At the top of the screen, click on the "add" button.
- Using the calendar, select the date.
- Input a transaction description.
- Optionally, assign a contact or business associated with the transaction.
- Choose a category; different sets of categories are shown based on your business type e.g. limited company, sole trader, UK and foreign property landlords.
- Select a transaction type, which is typically set to "business."
- Select a VAT rate if applicable.
- Enter the gross amount. The net amount will be calculated based on the VAT rate.
- Indicate whether this is a refund, and then click "submit."
The refund indicator
The Refund field marks whether a transaction is a reversal of a previously recorded one. It is not related to VAT refunds from HMRC. Select Yes in two situations:
- Receiving a refund from a supplier: you recorded an expense and the supplier later refunded you. Add a new transaction with the same expense category, set Refund to Yes, and enter the refund amount. This reduces that expense total rather than adding to it.
- Refunding a customer: you recorded income for a sale and later refunded the customer. Add a new transaction with the same income category, set Refund to Yes. This reduces your income figure.
In all other cases, leave Refund set to No.
Transaction display order: Transactions are always displayed in date order, not the order they were entered. You do not need to enter them chronologically.
Opening bank balance: To record a starting balance (so the app balance matches your actual bank statement from the point you started using My Tax Digital), add a transaction with category Balancing Transaction and type Personal. This category is excluded from VAT returns and tax calculations.
General-purpose categories — excluded from all submissions: The Bank Transfer, Balancing Transaction, and Other categories have no mapping to any HMRC field. Transactions in these categories are excluded from all VAT and ITSA calculations and will never appear on a tax return. Use them for internal record-keeping only (e.g. transfers between your own accounts, opening balances, or entries you have not yet categorised).
Default category: The transaction form always opens with Turnover selected as the default category — there is no way to change this default. If you regularly need to record many transactions of the same category (e.g. travel expenses), the CSV bulk import is a more efficient approach: pre-fill the Category column in your spreadsheet and import the whole batch at once via Transactions > Manage > Import. See Import Reference below for the exact values to use.
No dedicated notes field: There is no separate field for free-text notes on a transaction. Use the Description field to record any additional context you need.
To record a VAT payment or Self Assessment payment to HMRC, add a transaction using the HMRC payment category (listed under Expenses in the Import Reference below). This keeps the payment in your records without affecting your VAT return boxes or ITSA income figures. Similarly, if HMRC refunds you — for example, a VAT repayment — record it as income using the HMRC refund category.
To record a purchase invoice from a supplier, use Transactions — not the Invoices section. The Invoices section is for creating outbound sales invoices to send to your own customers and does not affect your VAT return. Add a transaction with the appropriate expense category (e.g. Cost of goods bought for resale), set the VAT rate to match the invoice, and enter the gross amount. The VAT will be included automatically in Box 4 (VAT reclaimed on purchases) and Box 7 (net value of purchases) of your next VAT return.

Importing Transactions in Bulk
You can import transactions in bulk from spreadsheets and CSVs.
- From the "transaction" screen, click on "manage" and then "import."
- On the "import" screen, select "file import."
- Open the file chooser with "select a file."
- Select a spreadsheet or CSV; these could be bank transactions or financial records from other accounting software.
- Click the "upload" button.
- Itax Digital will attempt to map your file's data. At a minimum, your file will need date, description, and amount.
- Check that the preview looks good, and then click "submit."
- If you make a mistake, you can delete the import and start again.
- You will now see all your imported transactions on the "transactions" screen.
Bank statement imports: Many banks (e.g. Starling) export a column called "Transaction type" containing values such as "ONLINE PAYMENT" or "CARD SUBSCRIPTION". Do not map this to our Transaction type field — it expects an MTD classification, not a banking descriptor. Leave the Transaction type field unmapped and categorise transactions individually after import, or replace the column values with one of the accepted values: Business, Business (EU), Personal, Disallowable, Unreconciled, Margin Scheme, or Ignore. For most business bank transactions, Business is the correct choice.
Recognised column headers: the import automatically maps common header names for the amount field(s) in your file:
Field Recognised headers Single (gross) amount Amount, Gross amount, Value Money in Pay in, Paid in, Credit amount Money out Pay out, Paid out, Debit amount If your file uses different column names, leave the field unmapped on the preview screen and select the correct column manually from the dropdown.
Download example transaction import template (XLSX)
Download example transaction import template (CSV)
Recurring expenses: My Tax Digital does not currently have a recurring or repeating transaction feature. If you have regular fixed costs (insurance, software subscriptions, etc.), the recommended workaround is to add all instances to a CSV and import them in bulk each quarter. Open Banking integration is planned for a future release, which will allow direct bank feed imports.
Editing and Deleting Transactions in Bulk
You can select multiple transactions and edit their category, transaction type, or VAT rate in one operation, or delete them all at once.
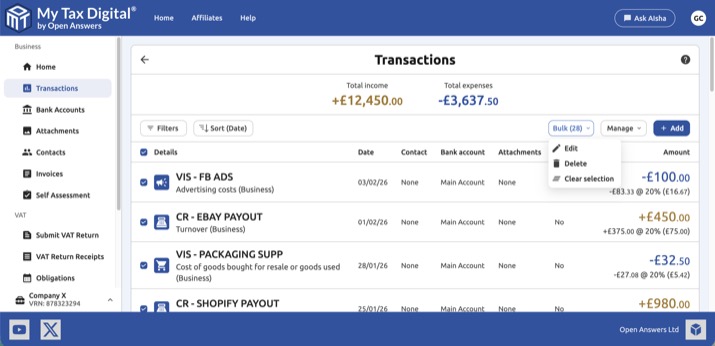
To select transactions:
- Tick the checkbox on each transaction you want to include. A Bulk (N) button appears in the toolbar showing how many are selected.
- To select all visible transactions, tick the checkbox in the column header.
To edit selected transactions:
- Click Bulk (N) and choose Edit.
- The Edit N transactions modal opens with three fields: Category, Transaction type, and VAT rate. Each defaults to No change.
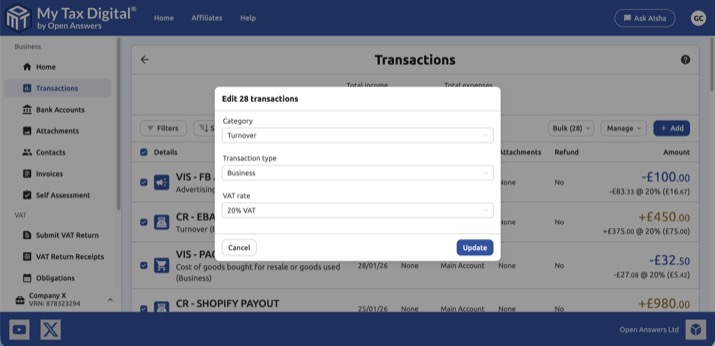
- Change only the fields you want to update — any field left as No change is left untouched on all selected transactions.
- Click Update to apply.
Only the fields you change are updated. You can, for example, set the category on a batch of transactions without affecting their transaction type or VAT rate.
To delete selected transactions:
- Click Bulk (N) and choose Delete.
- A confirmation dialog warns that any attachments on the selected transactions will also be permanently removed.
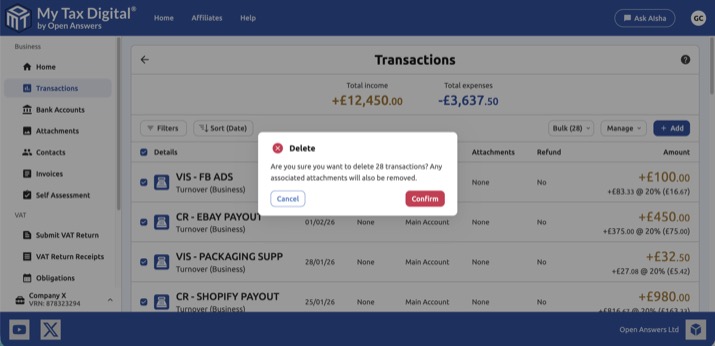
- Click Confirm to proceed, or Cancel to go back.
To deselect:
Click Bulk (N) and choose Clear selection, or untick individual checkboxes.
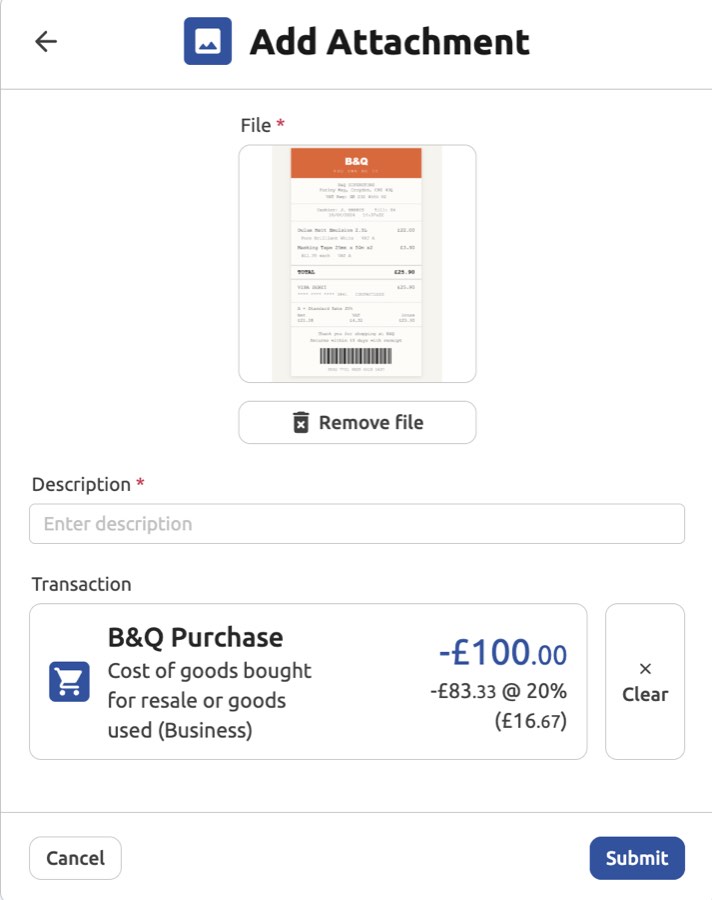
Attaching Receipts and Files
You can attach receipts, invoices, or other supporting documents directly to a transaction.
- From the Transactions screen, click on a transaction to open it.
- Click the Attachments section and then the + Add button.
- Select a file from your device (e.g., a photo of a receipt).
- Enter a Description for the file.
- Click Submit to save the attachment.
If a document covers more than one transaction (e.g. a monthly supplier statement), attach it separately to each relevant transaction — there is no limit on the number of attachments per transaction, and this is the expected approach.
Exporting and Searching Transactions
To export transactions:
- Click on "manage," then click "export."
- This action will download all your transactions to a CSV.
To search for specific transactions:
- Click on the "filters" button.
- Enter search criteria, which can include description, date, category, and amount.
Automatic MTD Submission Mapping
The great benefit of My Tax Digital's Accounting mode is that once you enter a transaction, the app automatically places the figure into the correct total for both your VAT and ITSA submissions.
| Submission Type | Transaction Figures Populate... | Mapping Logic (If Accounting Mode is Selected) |
|---|---|---|
| MTD for VAT | The nine boxes on your VAT Return (e.g., Box 1, Box 4, Box 6, Box 7). | The VAT Rate and Transaction Type determine the box. For example, a transaction of type Business with 20% VAT goes into Box 1 (VAT due) and Box 6 (Net sales). |
| MTD for ITSA | The cumulative totals in the Quarterly Updates for the selected income source (e.g., Company X). | The Category (e.g., Turnover, Motor Expenses) automatically sums up over the quarter to populate the corresponding Income & Expenses tile totals. |
HMRC Tax Form Mapping (ITSA)
The Category you select when adding a transaction maps directly to the income and expense category on the self assessment update form when in Accounting mode.
| Category Group (Examples) | HMRC Form Schedule |
|---|---|
| Turnover, Cost of Goods, Rent, Utilities, Travel | SA103S/F (Self-Employment) |
| Rents Received, Property Repairs, Rent, Rates & Insurance | SA105 (UK Property Income) |
| Foreign Tax Paid, Foreign Property Income | SA106 (Foreign Income) |
Transaction Types
Business
Choose this option for income received from customers for goods or services sold or money spent in order to run your business. Amounts entered will be used to calculate figures for your VAT return and Self Assessment form.
Business (EU)
Choose this option for income from supplies of goods and related costs to EC Member States or expenses due to acquisitions of goods and related costs from EC Member States prior to 1st January 2021. From 1st January 2021 this option should only be used for businesses based in Northern Ireland. Amounts entered will be used to calculate EC supplies and acquisitions for your VAT return and for your Self Assessment form.
For sales to EC non-VAT registered individuals, Type: Business (EU) should only be selected if your yearly sales are in excess of the distance selling threshold and you are registered for VAT in that EC country otherwise you should select Type: Business. See HMRC VAT Notice 725 for further details.
Unreconciled
An income or expense which you have not yet reconciled against a bank transaction. The amount will not be used in the calculation of your VAT return or Self Assessment.
Disallowable
An income or expense which is not wholly and exclusively for your business or expenditure which HMRC does not allow you to deduct from your revenue. This amount will not be used in the calculation of your VAT return.
Personal
A personal income or expense which is not wholly and exclusively for the business and will not be used in the calculation of your VAT return or Self Assessment.
Margin Scheme
Use the Margin Scheme for second-hand goods, works of art, antiques and collectors’ items. See The Margin and Global Accounting Scheme (VAT Notice 718) for more details.
If you use the VAT Margin Scheme (e.g., for second-hand goods), you must record the purchase and sale separately to track the profit margin.
-
Record Purchase: Create an Expense transaction with a Transaction Type of Business for the purchase price, setting the VAT Rate to 0%.
-
Record Sale: When you sell the item, create an Income transaction with the Transaction Type set to Margin Scheme.
- The app will use the difference between the purchase price (from the earlier expense) and the sale price to calculate the VAT due on the profit margin (16.67% of the margin), placing this small VAT amount into Box 1 of your VAT return.
Import Reference: Transaction Types and Categories
When importing transactions via CSV or spreadsheet, the app will attempt to automatically map common Transaction type and Category values from your file. If a value is not recognised and not mapped automatically, use the exact values listed below as a fallback (capitalisation and punctuation must match exactly).
Date format: Dates must use one of: YYYY-MM-DD (e.g. 2026-04-06), DD-MM-YYYY (e.g. 06-04-2026), or DD-MMM-YYYY / DD-MMM-YY (e.g. 06-Apr-2026 or 06-Apr-26). Day and month must be zero-padded and the year given in full, except the short month-name format, which takes a 2-digit year — a single-digit day/month or 2-digit year in any other format (e.g. 30/4/26) will not be recognised. This commonly catches out CSV files saved from Apple Numbers, which can default to a locale short-date format on export — reformat the date column to one of the formats above before importing, or use the XLSX template instead, which carries a real date value and avoids the issue entirely.
Transaction Types
| Value | Used for |
|---|---|
| Business | Standard business income or expense — included in VAT and ITSA calculations |
| Business (EU) | EC supplies and acquisitions (Northern Ireland businesses only, post-January 2021) |
| Margin Scheme | Second-hand goods sold under the VAT Margin Scheme |
| Unreconciled | Items not yet matched to a bank transaction — excluded from all submissions |
| Disallowable | Expenses not allowable for tax — excluded from ITSA but visible in records |
| Personal | Personal income or expenditure — excluded from VAT and ITSA |
| Ignore | Fully excluded from all calculations and submissions |
Categories
Categories depend on your income source type.
Self Employment (sole traders and general businesses)
Income: Turnover, Any other business income, Other income out of scope for VAT, HMRC refund
Expenses: Cost of goods bought for resale or goods used, Construction industry - payments to subcontractors, Wages, salaries and other staff costs (out of scope for VAT), Car, van and travel expenses, Rent, rates, power and insurance costs, Repairs and maintenance of property and equipment, Phone, fax, stationery and other office costs, Business entertainment costs, Advertising costs, Interest on bank and other loans, Bank, credit card and other financial charges, Irrecoverable debts written off, Accountancy, legal and other professional fees, Depreciation and loss or profit on sale of assets, Other business expenses, Other expenses out of scope for VAT, HMRC payment
The table below describes the major SE expense categories:
| Category | What to include |
|---|---|
| Cost of goods bought for resale or goods used | Stock, raw materials, and direct costs of producing or delivering your goods or services. |
| Construction industry - payments to subcontractors | CIS payments made to subcontractors (reported separately from general wages). |
| Wages, salaries and other staff costs | Employee wages, employers' National Insurance, and other payroll costs. |
| Car, van and travel expenses | Business mileage, vehicle running costs, public transport fares, and accommodation for business travel. |
| Rent, rates, power and insurance costs | Premises overheads: rent, business rates, gas, electricity, and business insurance. |
| Repairs and maintenance of property and equipment | Cost of maintaining and repairing business assets — not improvements or capital purchases. |
| Phone, fax, stationery and other office costs | Office supplies, printing, postage, business phone and internet. Also use this for computer hardware under cash basis (see §4.1). |
| Business entertainment costs | Client entertaining costs. Note: HMRC generally disallows these — record them here but be aware they are unlikely to reduce your tax bill. |
| Advertising costs | Marketing, advertising, and website costs. |
| Interest on bank and other loans | Interest charges on business loans and overdrafts. |
| Bank, credit card and other financial charges | Bank account fees, card transaction fees, and similar financial charges. |
| Irrecoverable debts written off | Amounts owed to you that you have written off as uncollectable (accruals basis only). |
| Accountancy, legal and other professional fees | Accountant, solicitor, and other professional adviser fees for the business. |
| Depreciation and loss or profit on sale of assets | Accounting depreciation entries (accruals basis). Under cash basis, record the asset purchase as an expense instead — no depreciation entry is needed. |
| Other business expenses | Any allowable business expense not covered by the categories above. |
General (excluded from tax calculations): Bank Transfer, Balancing Transaction, Other
UK Property (UK landlords)
Income: Rents received, Other income from property, Rents received from rent-a-room properties, Tax deducted from the rental income, Premiums for the grant of a lease, Reverse premiums and inducements, HMRC refund
Expenses: Rent, rates, insurance and ground rents, Property repairs and maintenance, Non-residential property finance costs, Legal, management and other professional fees, Costs of services provided, including wages, Other allowable property expenses, Car, van and travel costs, Rent a Room exempt, Residential property finance costs, Unused residential property finance costs brought forward, HMRC payment
General (excluded from tax calculations): Bank Transfer, Balancing Transaction, Other
Annual capital allowances not included here: Replacement of domestic items (SA105 Box 36) is not a transaction category and will never appear in this list or as a valid CSV import value. It is entered once a year under Adjustments & Allowances in the UK Property hub, not via Transactions (see UK Property income, §5).
Foreign Property (overseas landlords)
Income: Rent and other income, Other property income, Premiums paid for the grant of a lease, Foreign tax taken off or paid, UK tax taken off, HMRC refund
Expenses: Premises running costs, Repairs and maintenance, Financial costs, Professional fees, Cost of services, Travel costs, Residential financial cost, Brought forward residential financial cost, HMRC payment
General (excluded from tax calculations): Bank Transfer, Balancing Transaction, Other